Minimising Dry Matter Losses in Clamped Silage
16 June 2023Making silage is an expensive operation on any livestock farm but it is still one of the most cost-effective feeds after grass. Maximising the production of quality silage is therefore vital to a profitable enterprise. This factsheet identifies the key areas where losses can occur post-cutting and reviews the management practices that can help to minimise these losses and preserve silage quality as best as possible.

There are many factors that affect the yield and quality of a standing silage crop, such as the age of the grass ley, soil pH and health, fertiliser and organic manure application, and stage of maturity when cut.
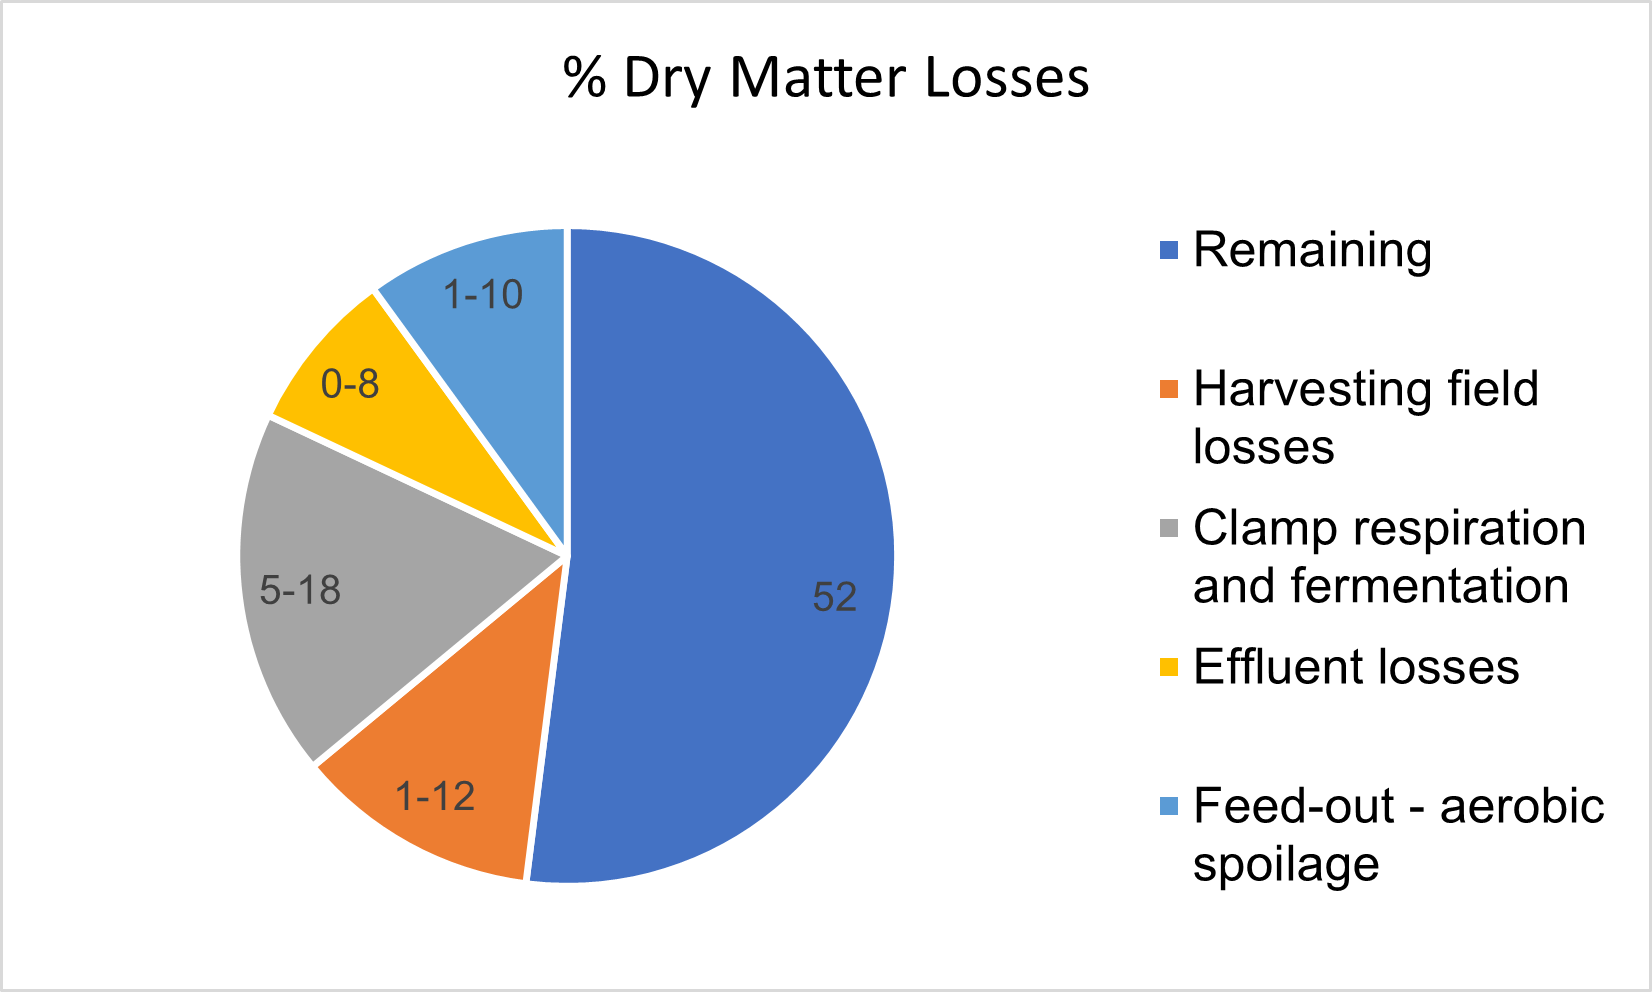
However, once the grass has been mowed for silage, there are several areas where dry matter (DM) losses can occur, and research indicates that DM losses in grass silage at feed out can be on average 25% of the initial crop. These losses represent valuable nutrients such as sugars, starches and soluble proteins. The losses can occur in the field, from effluent and from microbial deterioration during filling, storage and feed out of silage clamps (figure 1).
Figure 1. Sources of dry matter losses in silage making

Wilting
The aim of wilting is to reduce the moisture content of the grass and increase the DM to around 28 to 32%. By allowing the grass to wilt to this DM, the losses of digestible nutrients from field, effluent and during storage are minimised. If the grass is not wilted sufficiently and the DM is below 28%, sugars and other soluble carbohydrates and proteins are lost in effluent, representing a substantial loss of valuable energy.
The grass should be wilted for no more than 24 hours, although leys containing high levels of clover may require up to 36 hours to achieve the target DM. As soon as grass is cut it starts to deteriorate, with protein breaking down and sugars used up by bacteria naturally present on the grass, which convert sugar to carbon dioxide and water during respiration. As a result, there are fewer digestible nutrients brought into the clamp. This is why a fast wilt is essential to preserve as many nutrients as possible.
If weather conditions mean that the target DM is not achieved in 24 hours, there is little benefit to extending the wilting period, as yeast and moulds on the grass start to multiply, causing problems with aerobic spoilage during feed out and risk of mycotoxins.
Using a mower with a conditioner bruises the grass, helping speed up the rate of water loss. There are various types of conditioners, and the settings should be adjusted depending on how heavy the crop is and the type/maturity of the grass. Always refer to the manufacturer’s instructions.
Tedding the grass immediately after cutting to improve air circulation through the grass helps to speed up the drying process. After cutting, pores on the underside of the grass leaves are only open for two hours and once they close, the rate of moisture loss drops dramatically. When the pores are open, moisture loss is five times greater and so spreading the grass over 100% of the field immediately after cutting will make a significant difference to how quickly the target DM is achieved.
Grass left in large rows will struggle to be dry enough, even if left to wilt for longer than 24 hours. Tedding more than once may be required for dense crops but the more the grass is handled, the greater the risk of losses from leaf shatter (lowering the protein content of the silage) and production costs are increased.
Make sure the tedder and rakes are set to avoid touching the ground and bringing soil into the grass, which can affect the fermentation and increase clostridial bacteria within the silage, leading to poor palatability and reduced nutrient value.
The length of the wilting period will depend on the bulk of grass cut. For example, in multi-cut silage systems, lighter cuts of younger, leafier grass will lose moisture much quicker than more mature, stemmy material. It is possible to cut in the morning, once the dew has lifted and achieve the target DM that same day under good weather conditions. When cutting in the afternoon, the sugar content of the grass will be higher, but a 24-hour wilt will more likely be required to achieve the target DM, which will lead to more sugar losses.
Top Tip
Keep an eye on the DM content of tedded swards that are wilted for longer than 24 hours. There is no benefit of silage being drier than 32% DM and there are greater risks of aerobic spoilage at feed out with high DM silages.
Chop Length
Chop length will have an impact on how well silage is compacted in the clamp and this should vary according to the DM. For higher DM silages a shorter chop length is recommended as drier silages are more spongey and harder to squeeze the air out (table 1). Wetter silages are easier to compact and should have a longer chop length, which will help reduce nutrient losses from effluent and lower the risk of clamp slippage.
Table 1. Recommended chop length according to silage dry matter.
| Dry matter of silage (%) | Recommended chop length (cm) |
|---|---|
| Over 37 | 1 - 2 |
| 32 - 37 | 2.5 |
| 28 - 32 | 2.5 - 5 |
| 22 - 28 | 8 |
| Below 22 | 8 - 10 |
Source: Dr David Davies, Silage Solutions Ltd.
Clamp Filling and Consolidation
Consolidation is the single most important phase of the silage making process, with the aim of removing as much oxygen as possible to create anaerobic conditions within the clamp. For effective consolidation it is advised to fill and tramp the grass in even layers of no more than 15cm depth, although if the silage is below 25% DM, layers can be up to 25cm in depth. The angle of the layers should be no more than 20 degrees, as the greater the angle, the greater the risk of slippage during storage.
Removing air from the clamp can be done more effectively with use of a weighted implement behind the tractor (e.g. steel roller). This consolidates the grass under the full width of the tractor and not just beneath the wheels. Use of this equipment has been shown to increase silage density by as much as 40%, allowing more grass to be stored in the clamp.
Avoid over-consolidation, especially with wetter material (below 25% DM) as this can cause the grass plant cells to burst, releasing more sap and lubricating the silage, creating more effluent and more risk of slippage. The edges of the clamp are more difficult to consolidate so pay close attention to these areas and do not overfill the clamp above the walls as above this point, density is less.
Density will vary with the DM of the silage, height of clamped silage, chop length and how well it is consolidated (table 2). The target should be a minimum of 700kg/m3.
Table 2. Density of grass silage in kg/m3 according to dry matter and height in clamp.

Top Tip
If you can easily push your finger into the silage face, it was not consolidated enough.
Cover and Sealing the Clamp
Keeping air out of the clamp once sealed is crucial for a rapid and clean fermentation and reducing DM losses. A good airtight seal can be achieved using side sheeting, an oxygen barrier film and applying uniform weight across the top of the clamp, paying particular attention to the seal round the clamp edges.
Side sheets provide an effective gas barrier, as the side walls of clamps can be porous to gases, depending on their construction material. Even earth walls are gas porous, so side sheets are essential to maintain anaerobic conditions, as well as contain effluent. They will also protect the walls from corrosive damage from acidic silage effluent.
The use of side sheets that have a good overlap will help make an effective seal with the top sheet, reducing the risk of rainwater running off the top sheet and seeping into the silage. They will also protect the shoulders of the clamp which are the areas most susceptible to waste. A good overlap of 1-1.5 metres is recommended, which fold over the top of the clamp, with the top sheet placed on top.
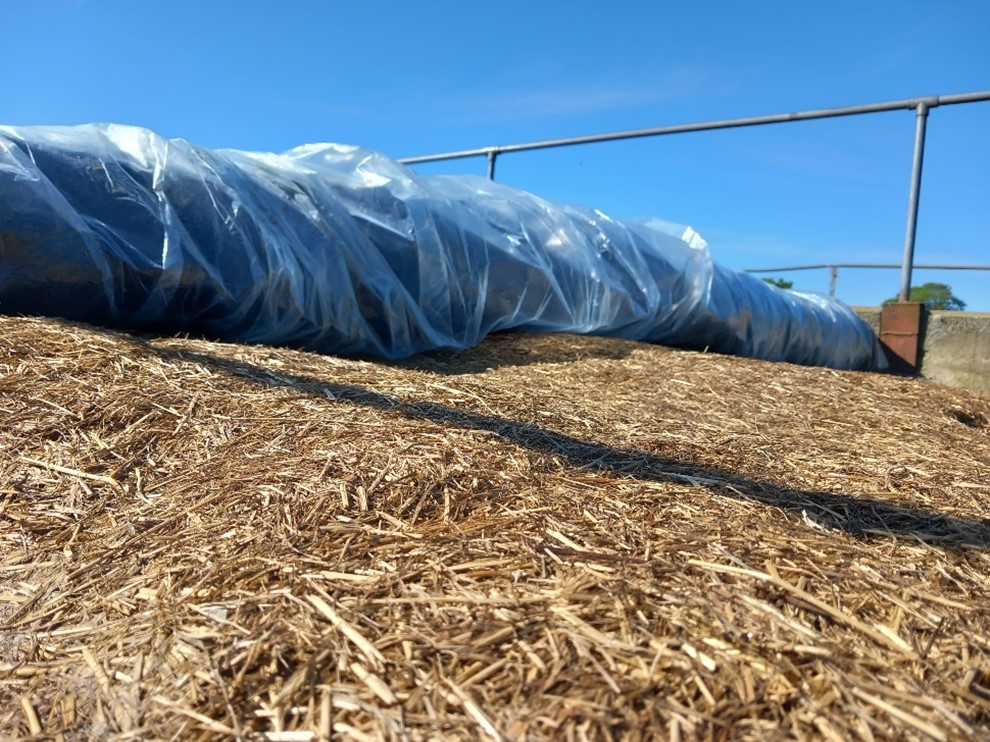
An oxygen barrier film can significantly reduce waste on the top layer of the clamp (figure 2) by being more effective in keeping oxygen out of the clamp, compared to the typical plastic top covers which are more porous. These films should be placed underneath the top plastic cover. There are also top sheet covers that come with the oxygen barrier film attached to the underside - a two in one cover.
Figure 2. Use of an oxygen barrier film beneath the plastic top sheet, resulting in little to no waste on top of the clamp.

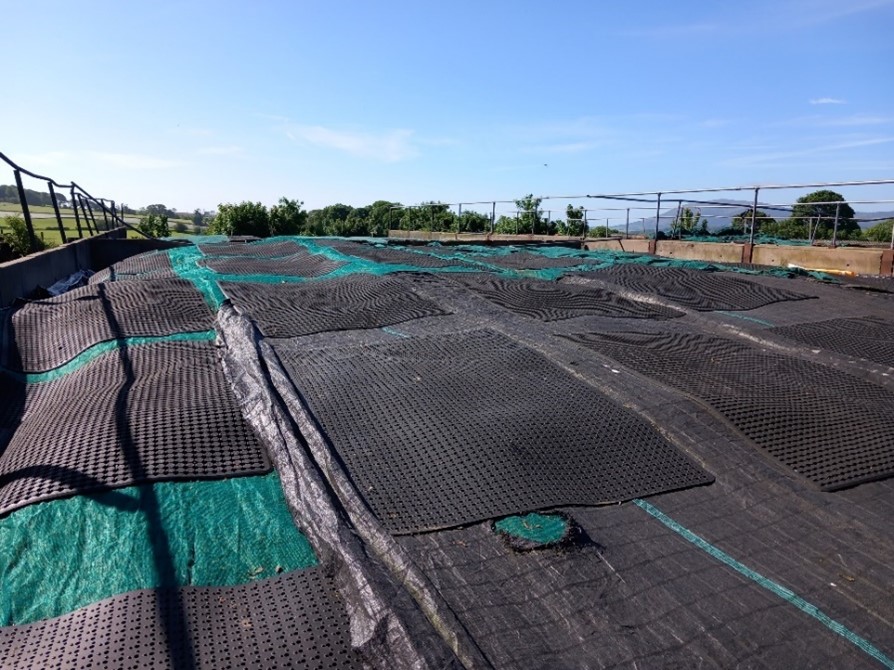
Once the clamp is sealed, apply as much weight on top of the clamp to maintain silage density. If using tyres, make sure they are touching each other so that weight is evenly distributed across the clamp and to prevent the plastic cover flapping in windy conditions. This has the effect of drawing air into the clamp. Heavy rubber mats (figure 3) are also effective for weight on top of the silage cover, as are straw bales on indoor clamps.
Figure 3. Heavy rubber mats providing even weight distribution on an outdoor silage clamp.

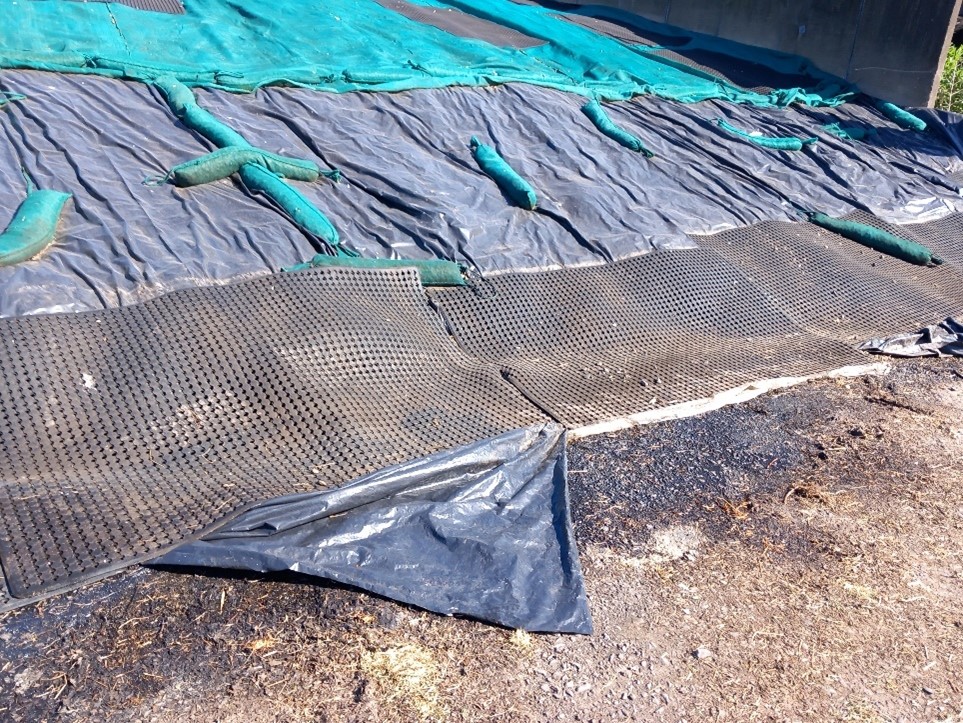
To minimise spoilage at the front of the ramp, the sheeting should extend at least 0.5 metres beyond the silage (figure 4). It should also be weighed down around the edge to prevent it billowing in the wind - if carbon dioxide produced during the fermentation is able to escape from the front of the clamp, a vacuum is created and oxygen will be sucked in.
Figure 4. A good example of the front edge of the silage clamp being well sealed and weighed down.

Water should also be prevented from entering the clamp. As water contains oxygen, any water ingress will benefit growth of aerobic (undesirable) organisms, as well as washing sugars and preservation acids out of the silage clamp. This not only reduces the feed value but can also lead to a higher pH in the areas affected by seepage, leading to faster deterioration of the silage exposed to air.
Tips to minimise ingress of water into silage:
- Inspect the clamp regularly and repair any damage to covers to keep air and water out.
- The top surface of the forage should be sloped to divert rainwater away from the open silage face and ensure it does not collect between the silage and the clamp wall.
- Ideally the floor of the clamp should be sloped so that water and effluent drains away from the silage face.
Silage Additives
The use of an additive will be particularly beneficial if the sugar content of the crop is below 3%. Sugars are essential for a quick fermentation, which causes a rapid drop in pH and preserves more nutrients. The sugar content can easily be tested for on a fresh grass sample, along with the nitrate level to ensure that all applied nitrogen fertiliser has been used up and converted to protein. The nitrate content should be below 1000mg/kg on a fresh weight basis. High nitrates can lead to a poorer fermentation, due to the higher buffering capacity which makes it more difficult to lower pH.
There are many types of additives available, and some are more suited to low DM or high DM grass. Additives containing feed grade preservatives, such as potassium sorbate, are best suited to high DM crops as the preservative is effective against the growth of moulds and yeasts which are more likely to be found on drier crops. Some additives contain enzymes which can help break down fibre in the grass, improving its digestibility. These additives are more suited to bulkier cuts, where the grass has been left to mature.
When it comes to selecting an additive, make sure it is suitable for:
- The crop you are ensiling (i.e. grass).
- The estimated DM of the crop.
- The equipment you have to apply it.
- In addition, ask to see trial work on the additive showing improvements in animal performance and the cost-benefit of the product.
Feed Out
Ideally wait a minimum of three weeks before opening and feeding out silage. The fermentation process with the reduction in pH and stabilisation of forage takes anywhere between 10 days to three weeks, although the vast majority of advice suggests waiting up to six weeks before feed out.
Remove only the amount of silage required for feeding. Any silage that is taken out of the face and left in a pile for feeding later or the next day is exposed to air and will start to deteriorate, and the effect on reduced feed value will be greater in warmer weather.
Using a block cutter or shear grab not only keeps the face tidy but minimises the surface area exposed to air. This keeps the amount of air getting into the silage face to a minimum, so there is less risk of aerobic spoilage. Waste on top of the clamp can be minimised by not pulling back the plastic cover too far and keeping the front edge weighed down. The sheet should not be pulled down over the silage face either. This creates a micro-climate, making conditions more favourable for the growth of yeasts and moulds which will spoil the silage and reduce its feed value.
Top tips to reduce DM losses at feed out are based on minimising exposure to air with good management of the clamp face:
- A narrow clamp face is beneficial. Very wide pits can easily be split in two. This will improve keeping quality of the face and provide more flexibility if feeding different cuts or forages.
- Cross the face quickly, ideally no more than four days especially in warm weather to reduce the time the silage is exposed to air.
- Use a block cutter to keep a tidy clamp face and avoid air ingress behind the face.
- Keep the sheet off the face and do not pull it back too far on the top of the clamp.
- Avoid damage to the plastic cover and make repairs if necessary.
- Feed out twice a day in hot weather to keep the silage as fresh as possible.
- Only remove the amount of silage required. Avoid having piles of excess silage sitting on the clamp floor for feeding out the next day as it will heat and spoil.
- Remove spoilt or visibly mouldy silage and do not feed. There is a risk of mycotoxins that can harm health, affect performance and cause abortion in breeding stock.
Summary
There are a number of steps during the silage-making process where potential losses of valuable nutrients can occur. However these can be minimised with good practice in the following areas:
- Wilting - do not overwilt and aim for no more than 24 hours. Wilting can be speeded up by tedding the grass immediately after it has been cut.
- Consolidate the grass well in even, flat layers to achieve high density throughout the clamp and reduce the risk of slippage.
- Ensure an airtight seal round the edge of the clamp - use side sheets with a minimum 1m overlap with the top sheet and good weight distribution, especially around the edges.
- Oxygen barrier sheet - use underneath the top plastic cover to reduce oxygen ingress into the top layer of the grass and reduce waste.
- Clamp face management - use a block cutter and keep a tidy clamp face, not removing more silage than is needed for feeding that day. Aim to cross the face in no more than four days.
Lorna MacPherson
Sign up to the FAS newsletter
Receive updates on news, events and publications from Scotland’s Farm Advisory Service
